Volunteer Distributed Supercomputer: Install BOINC on Debian
The Berkeley Open Infrastructure for Network Computing (BOINC) is a FLOSS "distributed supercomputer" dedicated to science.
There are various projects - each dedicated to a different field of research - that tackle massive computational challenges by breaking them down into thousands of smaller "jobs", then use the BOINC platform to distribute the jobs to a global network of volunteer computers to crunch through the work.
The truth is that our personal computing devices are now so powerful that often their CPUs are idle upwards of 99% of the time waiting for work. BOINC can run in the background and use that idle time to advance science. It can be configured to use as little or as much of the computational capacity of a device as you desire.
BOINC is currently installed on my desktop running Linux Mint Debian Edition (LMDE). I elect to use the latest stable *.deb packages from the project's repository vs the (older) packages provided by Debian.
This is how I do it...
1. Add GPG Key from keyserver
Configuration:
- Keyserver:
keyserver.ubuntu.com - Key ID:
40254C9B29853EA6 - Repository:
https://boinc.berkeley.edu/dl/linux/stable/bookworm bookworm main
$ sudo gpg --homedir /tmp --no-default-keyring --keyring /etc/apt/keyrings/boinc-archive-keyring.gpg --keyserver keyserver.ubuntu.com --recv-keys 40254C9B29853EA6
gpg: keybox '/etc/apt/keyrings/boinc-archive-keyring.gpg' created
gpg: /tmp/trustdb.gpg: trustdb created
gpg: key 40254C9B29853EA6: public key "Vitalii Koshura (BOINC DEB and RPM repos key) <lestat.de.lionkur@gmail.com>" imported
gpg: Total number processed: 1
gpg:               imported: 1
This command includes the following flags:
--homedirsets/tmpas the location for creating temporary files--no-default-keyringcombined with--keyringoutputs in this scenario to a new BOINC-specific keyring, instead of importing into the existing system keyring (the default behaviour)--keyservercombined with--recv-keysspecifies the download location and which key to download
2. Add repository to package sources
Add repository:
echo "deb [arch=amd64 signed-by=/etc/apt/keyrings/boinc-archive-keyring.gpg] https://boinc.berkeley.edu/dl/linux/stable/bookworm bookworm main" | sudo tee /etc/apt/sources.list.d/boinc.list
Update sources:
sudo apt update
3. Apt pinning
Set a preference for installing BOINC's own packages over the default package in Debian by increasing its "pin-priority":
printf "Package: *\nPin: origin boinc.berkeley.edu\nPin-Priority: 990\n" | sudo tee /etc/apt/preferences.d/boinc.pref
Update and display the new priorities (example: for package boinc-client):
$ sudo apt update
$ apt-cache policy boinc-client
boinc-client:
  Installed: (none)
  Candidate: 8.0.2-715
  Version table:
     8.0.2-715 990
        990 https://boinc.berkeley.edu/dl/linux/stable/bookworm bookworm/main amd64 Packages
     7.20.5+dfsg-1.1 500
        500 https://deb.debian.org/debian bookworm/main amd64 Packages
4. Install
NOTE: On headless systems like home servers, omit the boinc-manager graphical utility. On such systems, the BOINC client can be controlled either using boinccmd, or using a remote GUI.
sudo apt install boinc-client boinc-manager
Installation creates a new user and group, both labelled boinc. All created files and running processes belong to this user.
Add your username to the boinc group:
sudo adduser <your_username> boinc
5. Run
The BOINC Manager utility is boincmgr. Upon first launch, it opens in "Simple View" and prompts to select a distributed project to join.
Example: I crunch data for Einstein@Home. There are many to choose from: Choosing BOINC projects
For viewing progress and settings, in the menu choose View->Advanced View... for a more complete interface.
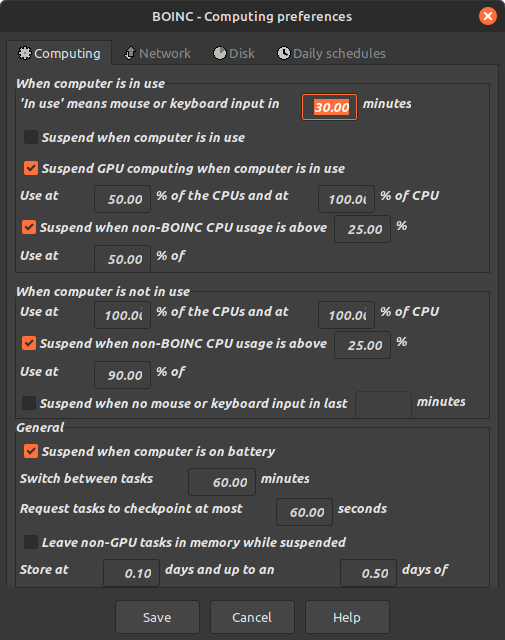
Go to Options->Computing preferences... and set when BOINC is allowed to run, number of CPUs to use, etc.
6. Launch BOINC at boot
sudo systemctl enable boinc-client.service
7. Resources
- BOINC User Manual
- Using GPG to Add External Repositories on Debian
- I reached 150 million points in BOINC
You can like, share, or comment on this post on Mastodon 💬
» Next: Run BOINC on a Headless Linux Server
« Previous: Converting a Tablet into a Digital Photo Frame